Scripting, Technology

Last-Logon or Lath-Lawgon?

The first one is after coffee.  The second one is with dentures removed and no coffee. 🙂

I needed to find the “real” last logon timestamp for a bunch of computers on a customer AD domain.  As you may be aware (or really don’t give a #*%#@), the PwdLastSet and LastLogon, attributes don’t have a Mickey Mouse club membership card, so they aren’t allowed into the Global Catalog replication party unless you snuff out the bouncer with, whatever, it’s too early to get stupid (7am here right now).

Anyhow, there may already be a cool script for this, but I couldn’t find it in time and my coffee was already cold, so here…

UPDATE:

#requires -Version 3.0
<#
.DESCRIPTION
  Queries most recent account logon timestamp from all domain controllers
  Can be wrapped as a function, but doing this as a file for now because
  I'm sooooooo lazy and tired.
.PARAMETER AccountName
  name or sAMAccountName for user or computer
.PARAMETER AccountType
  Either 'user' or 'computer' (default is 'user')
.PARAMETER Detailed
  switch that shows all queries results (default is only most recent 1)
.EXAMPLE
  .\Get-ADsAccountLastLogon.ps1 -AccountName 'jsmith' -AccountType User
.EXAMPLE
  .\Get-ADsAccountLastLogon.ps1 -AccountName 'ws001' -AccountType Computer -Detailed
.NOTES
  0.0.2 - DS - Updated while not asleep and actually had coffee
#>

param (
  [parameter(Mandatory=$True, HelpMessage="Account Name")]
    [ValidateNotNullOrEmpty()]
    [string] $AccountName,
  [parameter(Mandatory=$False, HelpMessage="Account Type")]
    [ValidateSet('User','Computer')]
    [string] $AccountType = 'User',
  [parameter(Mandatory=$False, HelpMessage="Show All Results")]
    [switch] $Detailed
)

function Get-ADsLastLogon {
  param (
    [parameter(Mandatory=$True, HelpMessage="Account Name")]
      [ValidateNotNullOrEmpty()]
      [string] $AccountName,
    [parameter(Mandatory=$False, HelpMessage="Account Type")]
      [ValidateSet('User','Computer')]
      [string] $AccountType = 'User'
  )
  # credit to "Chris" for the original code I just wrapped into a function:
  # ref: https://social.technet.microsoft.com/Forums/windows/en-US/ea5d24d4-eee3-48b6-a3e2-8b75cdc9eb27/how-do-i-poll-domain-controllers-from-a-powershell-adsi-script-to-determine-account-values-not-in-gc?forum=winserverDS&prof=required
  [DirectoryServices.ActiveDirectory.Domain]::GetCurrentDomain().DomainControllers | 
    ForEach-Object {
      $Server = $_.Name
      Write-Verbose "server: $Server"
      $SearchRoot = [ADSI]"LDAP://$Server"
      if ($AccountType -eq 'User') {
        $Searcher = New-Object DirectoryServices.DirectorySearcher($SearchRoot, "(sAMAccountName=$AccountName)")
      }
      else {
        $Searcher = New-Object DirectoryServices.DirectorySearcher($SearchRoot, "(name=$AccountName)")
      }
      $Searcher.FindOne() | 
        Select-Object @{n='Name';e={ $_.Properties["name"][0] }}, @{n='lastLogon';e={ (Get-Date "01/01/1601").AddTicks($_.Properties["lastlogon"][0]) }}, @{n='Server';e={ $Server }}
    } # foreach-object
} # function

if ($Detailed) {
  Get-ADsLastLogon -AccountName $AccountName -AccountType $AccountType | 
    Sort-Object lastLogon -Descending
}
else {
  Get-ADsLastLogon -AccountName $AccountName -AccountType $AccountType | 
    Sort-Object lastLogon -Descending | Select -First 1
}

The point of this is that I can use it within a pipeline to fetch the most-recent lastlogon timestamp value for accounts, using a variety of input options.  For example, Get-ADComputer, or using the DirectorySearcher ADSI interface, or from ADO query results, or from reading a file.

(Get-ADComputer).Name | %{.\Get-ADsAccountLastLogon.ps1 $_ -AccountType Computer }

Anyhow, it helped me, so I hope it’s of some use to you as well.  Cheers!

business, databases, Devices, Scripting, System Center, Technology

Asset Inventory, It’s not just for breakfast anymore

For those of you that read my blog this will probably sound familiar.  But for those not yet dunked in the stupid tank of my pontification gyrations, I hope you find this post useful in some way.  Maybe print it out and use it for a toilet bombing target.

Last night I was grilling some sort of roadkill and having a beer and my thumbs went out of control on Twitter.  It was a spur of the moment reflection on how this topic seems to repeat over and over.  For some reason, I assume “asset inventory” is important enough for most organizations to make it a priority.  But, more often than not, it seems not to be the case.

Why Asset Inventory Sucks

I explained why it sucks back in 2014 on my old blog, here.  It still sucks, because humans suck at keeping track of things.  However, recently I received a few requests to digress into this a bit more on the recommendation side, which is what this post is aimed at doing.  The biggest and most important piece is process. In fact, more than one process, but at least start there.

I must emphasize here the following:

There is no such thing as “perfect asset inventory”.  Whether you’re Wal-Mart or the US Department of Defense, shit gets lost.  And somewhere, somehow, that piece of shit has a record sitting in some shitty place that still says that shit is real shit and it exists somewhere.  But, if you try to put your hands on that shit, you find you’re shit out of luck.  But the goal should always be to get as close to “perfect” as you can, without inflicting harm on your business, your employees, or your customers.

Side Note: If you get bored, Google “US military missing inventory” and pull up a chair.  You’ll be reading for awhile.

Nuts and Bolts

When you look at how a device can be tracked throughout its lifetime, it’s actually not that different from how humans are tracked.

For either column, each row relates to a distinct system which maintains relevant information for that category.  And for either humans or devices, it’s not uncommon that each of those systems belongs to a different department, and they end up building silos of information.  It’s also not uncommon that each silo maintains redundant, and often inconsistent, information about the same asset/person.  Many of these systems have been developed independently for years before anyone thought to link them for various business needs.

For humans, there’s the hospital, the IRS, SSA, DMV, DHS, DOD, state and municipal government, as well as insurance companies, banks, web sites, schools, clubs, retailers, and so on.  Few of these entities routinely share the same information about the same people, and even then, still maintain their own data.  In this respect, devices aren’t that different from humans.

For devices, there’s a Purchase Order, Active Directory and Azure AD, EMS, Configuration Manager, SQL Server (behind multiple systems), HelpDesk systems, Logging systems, and disposal records.  In between, there are tons of home-grown apps/systems as well.

Finding the Wounds

The first thing to do is identify each tool (system, service, etc.) you already have, and identify what it tracks.  Document or diagram what each system tracks (types of information, attributes, etc.) and what pieces of information they have in common.  Common examples include Asset Tags, BIOS serial numbers, as well as manufacturer, model, etc.  For software-based systems, it may also be a GUID, SID or an LDAP cn, etc.

If you’re not primarily a DBA, kidnap one (they can be bribed with food, caffeine and Amazon gift cards).  Design a solution to extract ONLY the information you need to confirm the existence of an asset in each system.  In this design, determine what you need to compare across each system to insure consistency and find missing pieces (gaps).

Note: Be careful with data extraction (or queries) that you don’t over-burden the systems themselves.  This is particularly true for things like Configuration Manager, which are sensitive to SQL performance.

Get some reports to show assets which are not found in all systems, then use that to determine how the information is missing.  This often points to a process that needs to be updated.

For example, you determine that Jimmy, in the Purchasing Department, doesn’t capture some key pieces of information when a shipment arrives.  So you decorate Jimmy’s car with shaving cream and cat litter during lunch time, with a note warning him to pick up the slack.  And Debbie, ignores the weekly email report of machines which haven’t logged into AD in more than 180 days.  So, you sign Debbie up for every porn site mailing list using her personal email address, and cover her desk with cat litter, and Post-It notes with reminders to fill that information in soon.

WARNING: These are simply ridiculous suggestions made by random imaginary homeless people.  The author of this blog does not condone shaving cream, porn sites or Post-It notes.  In fact, the author doesn’t condone this blog.  Any similarity to real persons is unintentional. Batteries not included.  Void where prohibited.

Examples

Some of these may look familiar, as they are EXTREMELY common in most organizations.

  • Computer accounts left in Active Directory, long after a device has been disposed
  • Computer objects missing in ConfigMgr due to restrictive Discovery settings, limited user account, etc.
  • Asset management systems that rely on human data entry to identify assets
  • Lack of documented procedures for new hires to follow, especially in IT
  • Allowing people to “borrow” devices back from the disposal pile after they’ve been retired
  • Failing to update records when assigning an existing device to a different user
  • Relying on device names or descriptions in AD to identify user assignments

Control the Bleeding

  • Use scripting to manage orphaned AD computer accounts.
    • Search by LDAP attributes like PwdLastSet, Last-Logon, etc. (read the “remarks” section of Last-Logon for a general heads-up on using this)  You can modify the GC replication flag for these attributes (be very careful) or make your script query all domain controllers and compare results.
    • Machines which haven’t touched the network in a long time (usually more than 30 days, but it depends on the nature of your business) can be disabled and moved to a special OU using PowerShell (or whatever)
    • If nobody whines after X days, delete the accounts.  If they show-up the next day angry, just rejoin them to the domain and apply liberal amounts of pepper spray to the user. (just kidding, don’t do that)
    • For any automation you concoct, be sure it includes logging and reporting/notification throughout.  And be sure to include some “what-if” support to test without accidentally deleting the CEO’s laptop.  Think PowerShell [CmdletBinding(SupportsShouldProcess=$True)] , and $WhatIfPreference for things that don’t natively support -WhatIf, etc.
  • If you find inconsistencies between your inventory-related systems, determine why.  Then look for ways to replace human input with some sort of automation (PowerShell, PowerShell, PowerShell, a few table spoons of SQL and more PowerShell)
  • Establish (or update) your policies and procedures.  Seek advice from other organizations, books, and blogs.  Ask questions on forums like Slack, Reddit, StackOverflow, etc. as well.  Take your time, but get it right.
  • Be careful to not reinvent any wheels.  Don’t replicate more information than you really need, as it adds risk of creating yet another pool of information that could become isolated later on.

Notice that I lean towards PowerShell and building things.  You may prefer to use a third-party (free or retail) product or service, which is fine.  I come from the era before vendors bought up all the land for corporate software farming.  We had to grow our own goodies from scratch.  That’s not a binary choice however.  You can mix the two, such as using things like Sysinternals, SQL Express, and so on, along with scripting.  You have options.  Options are good.

Connecting the Dots

One final thought, and this crosses a lot of different aspects of IT operations.  This has to do with management support.  So often, the IT folks bemoan not having enough resources, training, or budgeted time, to get out front of the problems and fix them before they continue to grow out of control.  The biggest challenge in this is communication.

Management reads, writes and speaks in terms of money.  Saved or spent, it’s all about money.  A business exists to make money, after all.  IT folks read, write and speak operational efficiency.  It often ends up being like a singles bar, and Stevie Wonder is trying to hit on Helen Keller, but the bartender is just watching the train-wreck while drying glasses with a towel.  Consultants are often the bartender in this scene.

If you want to sell your idea to get support, you need to translate what you want into dollars.  Your idea HAS to either save or earn more money than any other option available to them.  This commercial was cute in its day, but it’s actually more true than anyone expected.

  • For every procedural change you want to make, be sure to identify how much money it will save (or new revenue it earns)
  • Talk to your vendors/suppliers about cost implications (licensing, terms, etc.)
  • Double-check your numbers and have someone in Finance review as well
  • Try to avoid solutions that increase costs to acquire or operate, IF you can find or build an equally capable solution for free.  Remember, you want to save your company money (or find new revenue streams).  If it comes down to one retail solution vs. another, so be it
  • Make your proposal clear enough for your grandfather to understand, even if he’s been dead for years
  • Don’t get too immersed in your solution.  There may be a better one, and ego is the devil

Good luck!


Scripting, System Center, Technology

PowerShell Toys and Tinkering with ConfigMgr

So… I needed a “quick” (easy/lazy) way to pull some common numbers from (almost) any ConfigMgr site, regardless of whether they’re on 2012 R2 up to 1809. It also has to work whether or not they have a RSP role available. In some cases, the SQL platform is locked up under DBA minefields, so SSMS isn’t always a given either.  All I need is “read” access to the CM database, where it resides.

What are these “common numbers” of which I speak?  Some examples…

  • Office 365 ProPlus installations
  • OneDrive sync client versions
  • For each, I needed 2 or 3 distinct variations, such as “Detailed”, “Total Counts” and “By Version”, etc.

The PowerShell script is pretty basic, so try to swallow your drink before you click on the download link (below).

It requires a sub-folder named “queries”, which you dump your .sql files into, like the samples shown below.  But you can put the folder anywhere and use the -QPath parameter to point to the correct location.  It reads in all .sql files and displays them in a gridview to select which to run.

The output options are “Grid” (default), “CSV” and “Pipeline”.

  • Grid – is the default, and just dumps the results into a Gridview panel
  • CSV – dumps the results to a CSV file with the same name as the selected SQL query (first gridview)
  • Pipeline – is the most powerful and sexy of the three amigos.  You can use this to post-process however you like, and is intended for use with the “detailed” flavors of query results.

I chose to put the .SQL files in their own place to allow easier updating, improving, replacing, adding to, etc.  So, the examples I linked above (and below) are only examples.  You may want to use your own, or add to the mix, etc.

If it makes sense, I may make a PS module out of it and post it to PS Gallery. I’ll wait to see if there’s any interest/need for that first.

Examples

.\Run-CmCustomQuery.ps1 -Verbose
.\Run-CmCustomQuery.ps1 -ServerName "cm1.fabrikam.local" -SiteCode "PS1"
.\Run-CmCustomQuery.ps1 -Output Pipeline | ?{$_.Installs -gt 50}
.\Run-CmCustomQuery.ps1 -Output Csv

Downloads

Don’t be bashful!  Let me know if you find this useful or complete garbage.

Cheers!

Scripting, System Center, Technology

CMHealthCheck 1.0.5 / Better Tasting and Still Gluten-Free

Updated 11:54 PM EDT 09/22/2018

If you already know what CMHealthCheck is, then I’d like to say “thank you!”.  If you are not aware of what it is, I’d like to say “thank you!” just for taking the time to read this far.  Seriously, most people would have fallen asleep by, right, about…..  here.

Still awake?  Ok.

CMHealthCheck

So 1.0.5 was published up to the PowerShell Gallery late last night or early this morning, it’s still too blurry for me.  Rather than re-explain the entire thing, which you can read here, I’ll focus on “what’s new!”, which is the added function: Export-CMHealthCheckHTML

This new laxative-powered meth-infused function comes with the following sex toys (parameter options) to control how it works.  Batteries not included…

Export-CMHealthCheckHTML parameters

  • ReportFolder – This is the folder path to where the output from Get-CMHealthCheck is found.  If you ran that against some unsuspecting ConfigMgr site server while it was passed out drunk, it should have cranked out something like ..\2018-09-21\cm01.contoso.local or ..\2018-09-21\cm01.ipukedonyourdoglastnight.local or whatever
  • OutputFolder – This is the path where you wish to make the HTML report file magically appear with an imaginary puff of smoke and glitter stuff.  The default is your user profile “Documents” folder.  The filename is “cmhealthreport.htm” because I don’t really have much of an imagination and my coffee ran out.
  • Detailed – this is a “switch” that just say “Hey man, tell me all and I mean ALL of the ugly details about my site”, you get the idea.
  • CustomerName – You probably figured this out, but it was conceived with the assumption this function will be used by a consultant.  So if you work for “DoucheBrain Corporation” then enter that or whatever.
  • AuthorName – Your name (assuming you don’t have people doing this for you while you lounge around on a yacht)
  • CopyrightName – Eh, whatever you want.  The default is me.
  • HealthcheckFilename – don’t mess with this.  the default works.
  • MessagesFilename – same as above
  • HealthcheckDebug – Use this if you want, or just -Verbose will work fine too.
  • Theme – This is where you can get stupid-fancy, whatever that means.  There are three included styles: Default, Emerald, Ocean and MonochromeMonochrome is boring.  Ocean is kind of blue-ish.  Emerald is green-ish, and there’s also “Custom“.
  • CssFilename – If you set Theme to “Custom” then this param is where you provide the CSS file path to use.  The CSS file content is imported into the HTML output, rather than linked.  Just because it felt right.
  • TableRowStyle – This allows you to apply some opiate-infused metaphysical coolness.  The options are “Solid“, “Alternating” and “Dynamic“.  When you use “Dynamic“, clap your hands together and say it like the prosecutor guy said “Identical” in My Cousin Vinnie.  If you haven’t seen the movie, stop right here and watch it now.  It’s that important.  Seriously.  I’m not kidding.  I’ll wait… all good?  Okay, so “Solid” just applies the styles without any fancy stuff.  “Alternating” does on/off styles on even/odd table rows (like Word’s table style 4 group, only without any real imagination), and “Dynamic” adds super-cheap mouse-over styling to table rows, so you can play with the report for hours, and get nothing done.
  • ImageFile – Adds your super fantabulous increditastical logo image to the heading of the report. The default is the same cheezy CMHealthCheck logo I created in PowerPoint (shown above) with 4 cups of coffee and 1 hour of sleep.  It’s okay, but you may want to insert your own logo to impress the boss.  Just specify the path and filename.  It will get smashed down to 100 x 100 pixels, just be aware.
  • OverWrite – I don’t think this param actually does anything, but I figured if you read this far, you might really care. I am honored. Seriously.

Example:  -Theme Emerald

cmhc-emerald

Note the green-ish effects of Emerald above.  Amazing, isn’t it?  Right up there with the Baby Mop, and P-38 can openers.

Still awake?

Why?

Well, the original version of this, which is still based heavily upon the incredible work of others like Raphael Perez, David O’Brien and probably others I’m forgetting, only provided a report via Microsoft Word.  And as most admins would agree, it’s not very common to install Microsoft Word on a ConfigMgr site server.  This means you have to generate the audit information on the site server, and then run the report publisher on a separate computer.  Cumbersome.

This function makes it possible to generate a report “directly on” the ConfigMgr site server without having to make any additional changes to the server.  And it looks kind of cool too.

How to Get it?

  • Open a PowerShell console on your ConfigMgr site server (CAS or Primary), which is on Windows Server 2012 R2 or later, with PowerShell 5.x or later, hopefully, using “Run as Administrator”
  • Install-Module CMHealthCheck
  • Accept the defaults (smack that “Y” key a few times, it’s okay)
  • Import-Module CMHealthCheck

How to Figure it out?

  • Type: Get-Module (press Enter)
  • Get-Module
  • Get-Command -Module CMHealthCheck
  • Get-Help Get-CMHealthCheck -Detailed
  • Inhale deeply, exhale slowly, avoid standing up too quickly
    • Drink your coffee or energy drink now
    • Read
  • After you export the data, locate the output folder and confirm it has a bunch of .xml files in it.
  • Get-Help Export-CMHealthCheckHTML -Detailed
  • Same steps as above (inhale/exhale/drink/read)
  • Use the amazing examples to help guide you to the desired options to try.  Try a few others and giggle out loud.  Why not?
  • Open the cmhealthreport.htm file
  • Send me a note on what you think about it (Twitter is okay, GitHub Issues entry is better)

Example

Export-CMHealthCheckHTML -ReportFolder "c:\projects\contoso\2018-09-21\cm1.contoso.local" -Detailed -CustomerName "Contoso" -AuthorName "His Royal Highness" -CopyrightName "It's mine, okay?" -Theme Ocean -TableRowStyle Dynamic -ImageFile "c:\projects\contoso\logo.png" -Verbose

If you like it, and want to express support, Amazon gift cards are really nice, just saying.  Or you can print out the source code, drop it in a toilet and decorate it too.

This entire mess of amateur writing was based on 1.0.5, so if you’re looking at a later version, please read the online documentation to see what may be new/different (or deprecated).  And bonus note:  Be careful not to use “depreciated” for “deprecated”, as they are very different words.

Cheers!

PS – I’m on travel next week, but not to Orlando unfortunately.  My replies may be slow.

Scripting, Technology, windows

Install 17 Apps in 16 minutes without Local Files

So I Tweeted this a few times, but some people DM’d me with questions about how, what, why Chocolatey, rather than NiNite, or some other bundling solution, and so on. Well, Chocolatey is essentially PowerShell. And since it can be installed from a remote URI, I can add layers on top of that to do my own thing.

I don’t need to download any installers, or prepare anything ahead of time (external storage, thumb drives, etc.).  Please read in entirety before forming any plans, judgments, opinions or tasteless jokes.

Ingredients

My setup is as follows:

  • A 5 year old HP Elitebook 9470m with 16 GB memory, and a Samsung EVO 850 SSD
  • A wired ethernet connection (wireless and LTE are fine if you aren’t in a hurry)
  • Windows 10 x64 1803 Enterprise or Professional (fresh/new install)
  • Renamed the Device and reboot

Process

  1. Open PowerShell using Run as Administrator
  2. Enter Set-ExecutionPolicy ByPass -Force
  3. Enter Invoke-Expression ((New-Object System.Net.WebClient).DownloadString(‘<URL>’)) and go

Keep in mind the “<URL>” is a placeholder for YOUR script location.  I have mine in Github, but any URL which publishes the raw file is fine.  By “raw” I mean no formatting garbage, ads, banners, etc. just the raw file contents.

You could also post the script content as a GIST, but for me, the GIST GUID string is too hard to remember unless I happen to be a savant.  So I used the dollar store discounted cheap-o version approach of the Github repo file “raw” link: https://raw.githubusercontent.com/Skatterbrainz/ChocolateyPackages/master/Install-Capps.ps1

That’s it.

Press Enter and grab a coffee.  When it’s done, which in my 18th test is now (on average) 16 minutes and 30 seconds, I’m ready to get busy.

The Code

The actual script is under one of my GitHub repos, so it may be modified after this blog post.  The following is for example purposes only.

#Requires -RunAsAdministrator
#Requires -Version 5
[CmdletBinding(SupportsShouldProcess)]
$time1 = Get-Date
Write-Host "setting up chocolatey" -ForegroundColor Green
if (!(Test-Path "$env:PROGRAMDATA\chocolatey\choco.exe")) {
    Write-Verbose "installing chocolatey"
    try {
        Invoke-Expression ((New-Object System.Net.WebClient).DownloadString('https://chocolatey.org/install.ps1'))
        Write-Verbose "chocolatey has been installed. yay!"
    }
    catch {
        Write-Warning "failed to install chocolatey..."
        Write-Warning $_.Exception.Message
        break
    }
}
else {
    Write-Verbose "chocolatey is already installed. yay!"
}
Write-Verbose "installing packages from internal list"
$pkgs = "googlechrome,7zip,notepadplusplus,vlc,slack,sysinternals,azurepowershell,git,visualstudiocode,azurestorageexplorer,keepass,jing,office365proplus,paint.net,putty,wmicc,teamviewer"
$count = 0
foreach ($pkg in $pkgs -split ',') {
    if ($WhatIfPreference) {
        choco install $pkg -whatif
    }
    else {
        choco install $pkg -y
    }
    $count++
}
Write-Host "finished!"-ForegroundColor Green
$time2 = Get-Date
$ts = $time2 - $time1
Write-Host $("$count packages installed. Elapsed time: {0:g}" -f $ts) -ForegroundColor Green

I’m sure you could modify this cheesy example to work better/faster, and jump through more hoops, which is fine.  Please do so!  If you do make a better version (or already have one), please let me know so I can share a link to it with others.

Caveats and Warnings

Nothing comes without possible downsides, even coffee and beer (hard to imagine).

  • Chocolatey, basic/free version, uses a public CDN / repository of packages.
  • If you’re not comfortable relying on source packages on the Internet, you can host your own internal repository and modify chocolatey to point to your controlled location.
  • You can buy business licensing for Chocolatey, which gives you additional tools and support, which I would recommend for business and education type environments.
  • There’s nothing wrong with other methods obviously.  This article is not intended to pitch this is a “better way” by any means.  Just an example of “another way”.  You must choose which cup to drink from.

The script shown and linked above is provided for example purposes only.  There is no warranty or guarantee of any kind, explicit or implied, for any purpose or use, as-is or in derivative works.  The author assumes no liability for alleged damages or loss of data arising from any use.  Users are advised to test in an isolated, non-production environment, to insure fitness and reliability prior to considering in other environments.  Use at your own risk.

Scripting, System Center, Technology

A Windows 10 Imaging 2-Step Boogaloo

It’s a new dance, and it goes like this…

Step 1 – Left foot forward: Image the device with a generic name, unplug, place on a shelf

Step 2 – Right foot to the side: Fetch from shelf, run script to assign to a user, hand device to user, go back to surfing Twitter

What could possibly go wrong?

Caveat Stuff

This “procedure”, if you will, is predicated on a scenario where the devices are NOT going to retain the auto-generated name when going into production.  They will instead use a unique name based on whomever they are assigned to (e.g. SAMaccountName, etc.).  If you can, I strongly recommend NOT doing this, which would seem strange that I’m essentially negating all of the remainder of this stupid blog post and telling you to just follow step 1, sort of.  However, if you insist on using “JSMITH”, or some other ad hoc data entry value, for the device name, then by all means, drink up, snort up, shoot up, and continue reading.  Thank you!

Errata / Disclaimer / Legal Stuff

At no point in any time in inter-galactic history, for any purpose or interstellar war or planetary conflict, shall anything mentioned herein be provided with any semblance of a warranty, guarantee, or promise that it will be error-free or suitable for your needs.  Nor shall this brainless author assume any liability, or responsibility for any direct, indirect, or alleged damages or loss of productivity, possibly attributed to the direct or indirect use of any information provided herein, for any purpose, explicit or implied, notwithstanding hereinafter for any jurisdiction of human societal or governmental law, or any group of suits on a golf course, related therein.  Golf carts and Martinis are not included.

…and One More Thing

Many blog posts / articles tend to portray a tone of “this is how it’s done”.  This blog post is different for two reason: (a) It’s just ONE example of dealing with ONE common scenario, out of quadrillions of bazillions and kadrillions of possible scenarios, and (b) it’s likely to be the dumbest article you’ve read today.

Step 1 – Image and Stage Device

This step is all about imaging a new device (or wipe/reload an existing device) whereby it isn’t immediately assigned to some whiney complainer, oops, I mean user.  It goes on a shelf, gathering dust, while it awaits being assigned to someone.

  1. Create / Copy / Hallucinate a PowerShell script:
    > It derives a name using available data (ex. Serial number, MAC, etc.).
    > Save the script in a shared location to allow for making a Configuration Manager Package.
    > Refer to horrifically inept script example further below.
  2. Create a new Package in Configuration Manager
    > Note: if you already have a OSD-related package for bundling your script goodies, just toss it in with the rest and they’ll play like over-caffeinated kids in one of those gooey McDonald’s Playland ball pits.
    > Distribute or Update Distribution on the Package
  3. Add a step to your OSD Task Sequence
    > Insert just before “Apply Operating System”
    > Run PowerShell Script –> Choose the Package, and enter the script name and parameters/arguments, select “ByPass”
    > Note: If you want to assign a common OU just assign it in the Task Sequence “Apply Network Settings” step, or add your own “Join Domain or Workgroup” step.
  4. Deploy the Task Sequence
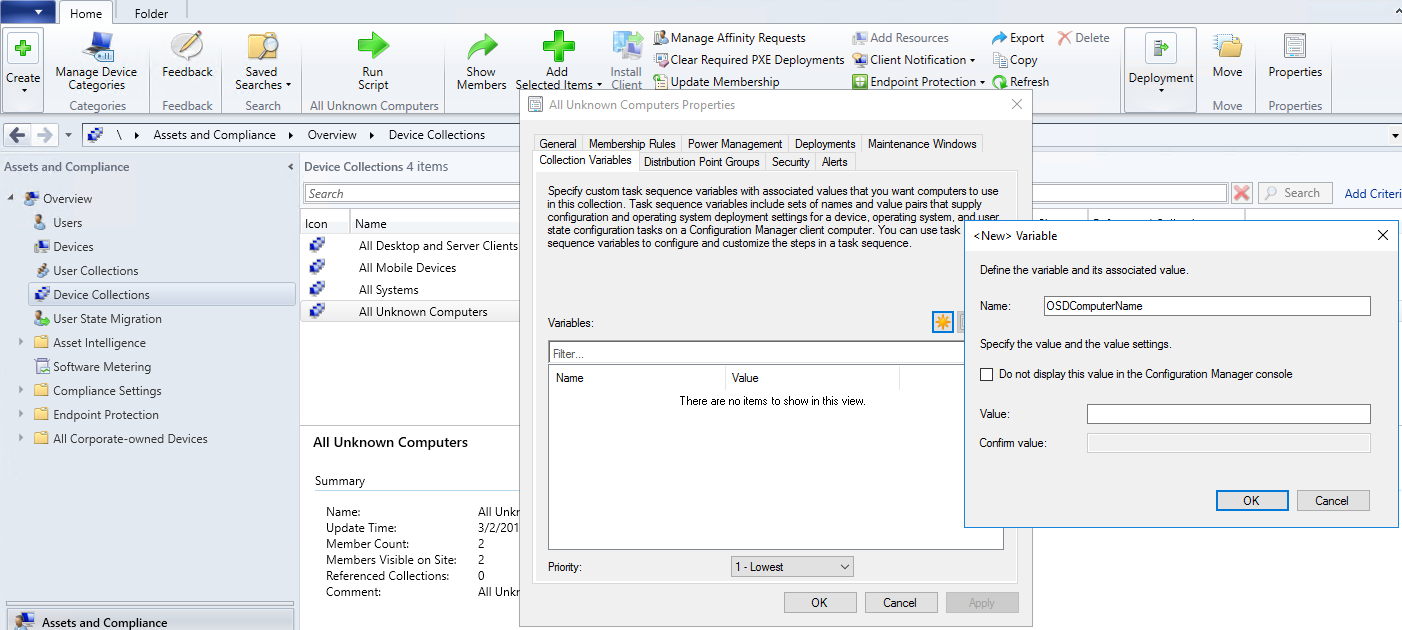
    > If you target “All Unknown Computers”, make sure the collection does not have the “OSDComputerName” Collection Variable attached

Step 2 – Provision and Assign to Hapless User

This step is all about getting up from your desk, grunting and complaining the entire way, maybe knocking over your cup of cold coffee, to shuffle slowly over to the dust-covered shelf, fetching a pre-imaged device, and doing some doodling on it so it can be handed to a bitchy customer, oops, again, I mean user.  Okay, in all seriousness, you may be lucky today, and the user is actually a cool person.  But you’re reading my blog, which means you’re probably not that lucky.

  1. Plug device into your network
  2. Find something to talk about while you wait for it to boot up
  3. Log in using your magical omniscient IT wizard power account
  4. Run a crappy half-baked PowerShell script which renames the device and moves it to a special AD Organizational Unit (OU) to suit the user’s department, etc.
  5. Wait for the reboot
  6. Unplug the device
  7. Throw at the user as hard as you can
  8. Go back to reading Facebook and Twitter
  9. Wait for Security to arrive and escort you out of the building

Horrifically Inept Script Examples

I told you they were going to be horrific and inept, but you didn’t think I was serious.

Script 1 – Assign a “Temporary” Device Name during OSD Task Sequence

Save this mess to a file named “Set-DeviceName.ps1”

[CmdletBinding()]
param (
  [parameter(Mandatory=$False)]
  [ValidateNotNullOrEmpty()]
  [string] $Prefix = "TMP"
)
$SerialNum = Get-WmiObject -Class Win32_SystemEnclosure | Select-Object -ExpandProperty SerialNumber
$NewName = "$Prefix-$SerialNum"
# in case you're imaging a VM with a stupid-long serial number...
if ($NewName.Length -gt 15) {
  $SerialNum = $SerialNum.Substring(0,15-($Prefix.Length+1))
}
$NewName = "$Prefix-$SerialNum"
try {
  Write-Verbose "new device name = $NewName"
  $tsenv = New-Object -COMObject Microsoft.SMS.TSEnvironment
  $tsenv.Value("OSDComputerName") = $NewName
  Write-Verbose "OSDComputerName = $NewName"
}
catch {
  Write-Verbose "not running in a task sequence environment"
  Write-Host "new device name = $NewName"
}

Script 2 – Provision Device for Assigned User

Note: The following chunk of PowerShell code might look impressive, but that’s because I didn’t create all of it.  I just modified original examples shared by John Warnken and Stephen Owen.  Save this mess to a file named “Assign-UserDevice.ps1”.  This script relies on the “Locations.csv” file to provide the list of locations and department codes for the popup form.

[CmdletBinding()]
param (
  [parameter(Mandatory=$False, HelpMessage="CSV input file path")]
    [string] $CsvFile = "",
  [parameter(Mandatory=$False, HelpMessage="Form Title")]
    [ValidateNotNullOrEmpty()]
    [string] $FormTitle = "Contoso - Provision Device",
  [parameter(Mandatory=$False, HelpMessage="Maximum UserName character length")]
    [ValidateRange(1,15)]
    [int] $MaxUserNameLength = 11,
  [parameter(Mandatory=$False, HelpMessage="Force Upper Case username")]
    [switch] $IgnoreCase,
  [parameter(Mandatory=$False, HelpMessage="Keep existing OU location")]
    [switch] $KeepOuLocation,
  [parameter(Mandatory=$False, HelpMessage="Apply Changes")]
    [switch] $Apply,
  [parameter(Mandatory=$False, HelpMessage="Do not force a restart")]
    [switch] $NoRestart
)

$ScriptPath = Split-Path -Parent $PSCommandPath
if ($CsvFile -eq "") {
  $CsvFile = Join-Path -Path $ScriptPath -ChildPath "Locations.csv"
}

function Move-ComputerOU {
  param (
    [parameter(Mandatory=$True)]
    [ValidateNotNullOrEmpty()]
    [string] $TargetOU
  )
  $ComputerName = $env:COMPUTERNAME
  $ads=[adsi]''
  $adssearch = New-Object DirectoryServices.DirectorySearcher
  $adssearch.searchroot = $ads
  $adssearch.filter="(objectclass=computer)"
  $adc1 = $adssearch.findall() | Where-Object {$_.properties.item("cn") -like $ComputerName}
  $ComputerDN = $adc1.properties.item("distinguishedname")
  Write-Verbose "distinguishedName = $ComputerDN"
  $adc = [adsi]"LDAP://$ComputerDN"
  $targetOU="LDAP://$targetOU"
  Write-Verbose "target path = $targetOU"
  $adc.psbase.MoveTo($targetOU)
}

if ($MaxUserNameLength -gt 9) {
  Write-Warning "UserName portion cannot be longer than 9 characters when the prefix is 6 characters long"
  break
}

if (!(Test-Path $CsvFile)) {
  Write-Warning "CSV Input file not found: $CsvFile"
  break
}
$LocData = Import-Csv -Path $CsvFile

[xml]$XAML = @' 
<Window 
  xmlns="http://schemas.microsoft.com/winfx/2006/xaml/presentation" 
  xmlns:x="http://schemas.microsoft.com/winfx/2006/xaml" 
  Title="" 
  Height="200" Width="320" Topmost="True" WindowStyle="ToolWindow" 
  WindowStartupLocation="Manual" Top="200" Left="200" 
  FocusManager.FocusedElement="{Binding ElementName=ComputerName_text}"> 
  <Grid> 
    <Label Name="Label_Warn" Content="" HorizontalAlignment="Left" Foreground="#ff0000" Height="27" Margin="15,0,0,0" VerticalAlignment="Top" Width="300" />
    <Label Name="Label_Loc" Content="Loc+Dept" Foreground="#000000" HorizontalAlignment="Left" Height="27" Margin="15,20,0,0" VerticalAlignment="Top" /> 
    <Label Name="Label_Dlm" Content="-" Foreground="#000000" HorizontalAlignment="Left" Height="27" Margin="125,50,0,0" VerticalAlignment="Top" />
    <Label Name="Label_Num" Content="UserName" Foreground="#000000" HorizontalAlignment="Left" Height="27" Margin="150,20,0,0" VerticalAlignment="Top" />
    <ComboBox Name="Combo_Loc" Margin="20,50,0,0" Height="27" Width="90" HorizontalAlignment="Left" VerticalAlignment="Top" VerticalContentAlignment="Center">
    </ComboBox>
    <TextBox Name="Text_User" Margin="150,50,0,0" Height="27" Width="90" HorizontalAlignment="Left" VerticalAlignment="Top" VerticalContentAlignment="Center" Text="" MaxLength="20" CharacterCasing="Lower" />
    <Button Name="Button_Continue" Content="Continue" Margin="90,100,0,0" HorizontalAlignment="Left" VerticalAlignment="Top" Height="27" Width="100"/> 
  </Grid>
</Window> 
'@
[void][System.Reflection.Assembly]::LoadWithPartialName('presentationframework') 

# Read XAML string and convert into a form object
$reader = (New-Object System.Xml.XmlNodeReader $xaml) 
$Form = [Windows.Markup.XamlReader]::Load( $reader ) 

# Add Form objects as script variables 
$xaml.SelectNodes("//*[@Name]") | ForEach-Object {Set-Variable -Name ($_.Name) -Value $Form.FindName($_.Name)} 

foreach ($loc in $LocData) {
  $LocDept = "$($loc.Loc)$($loc.Dept)"
  $Combo_Loc.AddChild($LocDept)
}

$Form.Title = $FormTitle
$Text_User.Maxlength = $MaxUserNameLength
if (!($IgnoreCase)) {
  $Text_User.CharacterCasing = "Upper"
}
# add form handler for pressing Enter on UserName text box
$Text_User.add_KeyDown({
  if ($args[1].key -eq 'Return') {
    Write-Verbose "action -> user pressed Enter on username textbox"
    $Location = $Combo_Loc.SelectedValue
    $UserName = $Text_User.Text.ToString()
    Write-Verbose "selection -> $Location"
    Write-Verbose "username -> $UserName"
    if (!([string]::IsNullOrEmpty($Location))) {
      $Script:LocIndex = $Combo_Loc.SelectedIndex
      $Script:NewName = $Location+'-'+$UserName
      $Script:Ready = $True
    }
    $Form.Close() 
  }
})
# add form handler for clicking Continue button on exit
$Button_Continue.add_Click({
  Write-Verbose "action -> pressed Continue button"
  $Location = $Combo_Loc.SelectedValue
  $UserName = $Text_User.Text.ToString()
  Write-Verbose "selection -> $Location"
  Write-Verbose "username -> $UserName"
  if (!([string]::IsNullOrEmpty($Location))) {
    $Script:LocIndex = $Combo_Loc.SelectedIndex
    $Script:NewName = $Location+'-'+$UserName
    $Script:Ready = $True
  }
  $Form.Close() 
})
# display the form for the user to interact with

$Form.ShowDialog() | Out-Null

if (!($Script:Ready)) {
  Write-Warning "No selection or entry. Nothing to do."
  break
}

$RowSet = $LocData[$Script:LocIndex]
$OuPath = $RowSet.DeviceOU

if ($Apply) {
  Write-Host "New Name...: $NewName" -ForegroundColor Green
  if (-not ($KeepOuLocation)) {
    Write-Host "OU Path....: $OuPath" -ForegroundColor Green
    Move-ComputerOU -TargetOU $OuPath
  }
  Write-Verbose "renaming computer to $NewName"
  Rename-Computer -NewName $NewName -Force
  if (!($NoRestart)) {
    Restart-Computer -Force
  }
}
else {
  Write-Host "Test Mode (No changes were applied)" -ForegroundColor Cyan
  Write-Host "New Name...: $NewName" -ForegroundColor Cyan
  if (-not ($KeepOuLocation)) {
    Write-Host "OU Path....: $OuPath" -ForegroundColor Cyan
  }
}

Locations.csv File for Assign-UserDevice.ps1

Note: “Loc” can be a building, campus, city, or whatever.  The ADGroup column is for future/optional/possible/potential use for adding the computer to an AD security group as well.

Loc,Dept,DeviceOU,ADGroup
BOS,HR,"OU=Workstations,OU=HR,OU=Boston,DC=Contoso,DC=local",
BOS,RD,"OU=Workstations,OU=Research,OU=Boston,DC=Contoso,DC=local",
MIA,HR,"OU=Workstations,OU=HR,OU=Miami,DC=Contoso,DC=local",
MIA,MK,"OU=Workstations,OU=Marketing,OU=Miami,DC=Contoso,DC=local",
SFO,FN,"OU=Workstations,OU=Finance,OU=SanFrancisco,DC=Contoso,DC=local",
SFO,HR,"OU=Workstations,OU=HR,OU=SanFrancisco,DC=Contoso,DC=local",
SFO,RD,"OU=Workstations,OU=Research,OU=SanFrancisco,DC=Contoso,DC=local",
TMP,HR,"OU=Workstations,OU=HR,OU=Tampa,DC=Contoso,DC=local",

Cheesy Examples

Example: Assign-UserDevice.ps1 -MaxUserNameLength 9 -Verbose

Summary and Conclusion

As you may have surmised by now, everything you’ve read above is completely stupid and useless. You’re shaking your head in disbelief that you skipped some other opportunity to read this, and you should have chosen otherwise, even if that other opportunity was a prostate exam.  You are now dumber for having read this.

You’re welcome.

databases, Scripting, System Center, Technology

Miscellaneous SCCM Configuration Stuff using PowerShell with Fries and a Coke

Rather than trying to build some Frankenstein stack of horrors, I decided to piecemeal this instead. What I mean is that in the past I would approach everything like I did back in my app-dev life, and try to make everything an API stack. But more often, for my needs anyway, I don’t need a giant roll-around tool case with built-in workbench. I just need a toolbox with a select group of tools to fit my project tasks.  This makes it easier to cherry-pick useful portions and ignore, or laugh at the rest, as you see fit.  Anyhow, hopefully some of it is useful to others.

  • Version 1.0 – 06/05/2018 – initial post
  • Version 1.1 – 06/08/2018 – added more crappy examples to bore you to death

Purpose:  Why not?

Intent: Automate some or all of the tasks with installing Configuration Manager on a modern Windows platform using PowerShell.

Caveats: You might have better alternatives to each of these snippets.  That’s cool.

Assumptions:  Most examples are intended for processing on the primary site server or CAS, rather than from a remote workstation.  However, considering the author, they can easily be improved upon.

Disclaimer: Provided “as-is” without warranties, test before using in production, blah blah blah.

Example Code Snippets

Set SQL Server Memory Allocation

Note:  Neither dbatools or sqlps provide a direct means for configuring minimum allocated memory for SQL Server instances.  For the the max-only example, I’m using dbatools for simplicity.  For the min and max example, I’m using SMO, because SMO contains “MO”, and “MO” is used for phrases like “mo money!” and “mo coffee!”

[CmdletBinding()]
param (
  [parameter(Mandatory=$False, HelpMessage="SQL Host Name")]
  [string] $SqlInstance = "$($env:COMPUTERNAME).$($env:USERDNSDOMAIN)",
  [parameter(Mandatory=$False, HelpMessage="Mo Memory. Mo Memory!")]
  [int32] $MaxMemMB = 25600
)
# following line is optional unless you've already finished off that bottle of wine
Install-PackageProvider -Name NuGet -MinimumVersion 2.8.5.201 -Force
Install-Module dbatools -AllowClobber -SkipPublisherCheck -Force
Import-Module dbatools
Set-DbaMaxMemory -SqlInstance $SqlInstance -MaxMB $MaxMemMB

Using SMO, because it has “mo” in the name…

[CmdletBinding()]
param (
  [parameter(Mandatory=$False, HelpMessage="SQL Host Name")]
  [string] $SqlInstance = "$($env:COMPUTERNAME).$($env:USERDNSDOMAIN)",
  [parameter(Mandatory=$False, HelpMessage="Mo Memory. Mo Memory!")]
  [int32] $MaxMemMB = 25600
)
[reflection.assembly]::LoadWithPartialName("Microsoft.SqlServer.Smo") | Out-Null
$srv = New-Object Microsoft.SQLServer.Management.Smo.Server($SQLInstanceName)
if ($srv.status) {
  $srv.Configuration.MaxServerMemory.ConfigValue = $MaxMemMB
  $srv.Configuration.MinServerMemory.ConfigValue = 8192 
  $srv.Configuration.Alter()
}

Set CM Database Recovery Model to Simple

[CmdletBinding()]
param (
  [parameter(Mandatory=$False, HelpMessage="Server Name")]
  [string] $SqlInstance = "$($env:COMPUTERNAME).$($env:USERDNSDOMAIN)",
  [parameter(Mandatory=$False, HelpMessage="Site Code")]
  [string] $SiteCode = "P01"
)
Import-Module dbatools
Set-DbaDbRecoveryModel -SqlInstance $SqlInstance -Database "CM_$SiteCode" -RecoveryModel SIMPLE

Set CM Database Service Principal Name (SPN)

[CmdletBinding()]
param (
  [parameter(Mandatory=$False, HelpMessage="SQL Host Name")]
  [string] $SqlInstance = "$($env:COMPUTERNAME).$($env:USERDNSDOMAIN)",
  [parameter(Mandatory=$False, HelpMessage="SQL Instance Name")]
  [string] $InstanceName = "MSSQLSvc",
  [parameter(Mandatory=$False, HelpMessage="SQL Server Account")]
  [string] $SqlAccount = "$($env:USERDOMAIN)\cm-sql"
)
$SpnShort = $SqlInstance.split('.')[0]
if ((Test-DbaSpn -ComputerName $SqlInstance).InstanceServiceAccount[0] -ne $SqlAccount) {
  $Spn1 = "$InstanceName/$SpnShort:1433"
  $Spn2 = "$InstanceName/$SqlInstance:1433"
  try {
    Set-DbaSpn -SPN $Spn1 -ServiceAccount $SqlAccount -Credential (Get-Credential)
    Set-DbaSpn -SPN $Spn2 -ServiceAccount $SqlAccount -Credential (Get-Credential)
  }
  catch {
    Write-Error $_.Exception.Message
  }
}
else {
  Write-Warning "SPN is already configured.  Go back to sleep"
}

Add CM SQL Service Account to “Log on as a Service” Rights

[CmdletBinding()]
param (
  [parameter(Mandatory=$False, HelpMessage="Service Account Name")]
  [string] $AccountName = "$($env:USERDOMAIN)\cm-sql"
)
Install-Module carbon -SkipPublisherCheck -AllowClobber -Force
if ((Get-Privilege -Identity $AccountName) -ne SeServiceLogonRight) {
  try {
    Grant-Privilege -Identity $AccountName -Privilege SeServiceLogonRight
  }
  catch {
    Write-Error $_.Exception.Message
  }
}
else {
  Write-Warning "Already granted service logon rights. Continue drinking"
}

Set WSUS IIS Application Pool properties

[CmdletBinding()]
param (
  [parameter(Mandatory=$False, HelpMessage="Queue Length")]
  [int32] $QueueLength = 2000,
  [parameter(Mandatory=$False, HelpMessage="Private Memory Limit")]
  [int32] $PrivateMemoryLimit = 7372800
)
Import-Module WebAdministration -DisableNameChecking
try {
  Set-ItemProperty IIS:\AppPool\WsusPool -Name queueLength -Value $QueueLength
  Set-ItemProperty IIS:\AppPool\WsusPool -Name recycling.periodicRestart.privateMemory -Value $PrivateMemoryLimit
}
catch {
  Write-Error $_.Exception.Message
}

Move WSUS SQL Database Files

[CmdletBinding()]
param (
    [parameter(Mandatory=$False, HelpMessage="New Database Files Path")]
    [string] $NewFolderPath = "G:\Database"
)
$ServerName = $env:COMPUTERNAME
$DatabaseName = "SUSDB"
$ServiceName = "WsusService"
$AppPool = "WsusPool"

if (!(Test-Path $NewFolderPath)) { mkdir $NewFolderPath -Force }
if (!(Test-Path $NewFolderPath)) {
  Write-Error "Your request died a horrible flaming death."
  break
}
Import-Module WebAdministration
Write-Verbose "stopping WSUS application pool"
Stop-WebAppPool -Name $AppPool
Write-Verbose "stopping WSUS service"
Get-Service -Name $ServiceName | Stop-Service

Import-Module SQLPS -DisableNameChecking
$ServerSource = New-Object "Microsoft.SqlServer.Management.Smo.Server" $ServerName

Write-Verbose "detaching WSUS SUSDB database"
$Db = $ServerSource.Databases | Where-Object {$_.Name -eq $DatabaseName}
$CurrentPath = $Db.PrimaryFilePath
$ServerSource.DetachDatabase($DatabaseName, $True, $True)
$files = Get-ChildItem -Path $CurrentPath -Filter "$DatabaseName*.??f"
Write-Verbose "moving database files to $NewFolderPath"
$files | Move-Item -Destination $NewFolderPath
$files = (Get-ChildItem -Path $NewFolderPath -Filter "$DatabaseName*.??f") | Select-Object -ExpandProperty FullName
Write-Verbose "attaching database files"
# hard-coded 'sa' as the DB owner because I'm lazy AF
$ServerSource.AttachDatabase($DatabaseName, $files, 'sa')

Write-Verbose "starting WSUS service"
Get-Service -Name $ServiceName | Start-Service

Write-Verbose "starting WSUS app pool"
Start-WebAppPool -Name $AppPool

Write-Host "WSUS database files have been moved to $NewFolderPath"

Create System Management AD Container

[CmdletBinding()]
param (
  [parameter(Mandatory=$False, HelpMessage="Domain Suffix")]
  [string] $DomainSuffix = "DC=contoso,DC=local"
)
if (!(Get-Module -ListAvailable | Where-Object {$_.Name -eq 'ActiveDirectory'})) {
  Install-WindowsFeature RSAT-AD-Tools -IncludeAllSubFeature -IncludeManagementTools
}
Import-Module ServerManager
Import-Module ActiveDirectory

if (!(Get-ADObject -Identity 'CN=System Management,CN=System,'+$DomainSuffix)) {
  New-ADObject -Name 'System Management' -Path 'CN=System,'+$DomainSuffix -Type container |
    Set-ADObject -ProtectedFromAccidentalDeletion:$True -Confirm:$False
}

Grant Permissions on System Management Container (added in 1.1)

[CmdletBinding()]
param (
  [parameter(Mandatory=$False, HelpMessage="Your Domain Suffix")]
  [string] $DomainSuffix = "DC=contoso,DC=local",
  [parameter(Mandatory=$False, HelpMessage="Site Server Name")]
  [string] $SiteServer = "CM01"
)
$AdObj = [ADSI]("LDAP://CN=System Management,CN=System,$DomainSuffix")
try {
  $computer = Get-ADComputer $SiteServer
  $sid = [System.Security.Principal.SecurityIdentifier] $computer.SID
  $identity = [System.Security.Principal.IdentityReference] $SID
  $privs = [System.DirectoryServices.ActiveDirectoryRights] "GenericAll"
  $type = [System.Security.AccessControl.AccessControlType] "Allow"
  $inheritanceType = [System.DirectoryServices.ActiveDirectorySecurityInheritance] "All"
  $ACE = New-Object System.DirectoryServices.ActiveDirectoryAccessRule $identity, $privs, $type, $inheritanceType
  $AdObj.psbase.ObjectSecurity.AddAccessRule($ACE)
  $AdObj.psbase.commitchanges()
}
catch {
  Write-Error $_.Exception.Message
}

Import Windows 10 OS Image (added in 1.1)

[CmdletBinding()]
param (
  [parameter(Mandatory=$False, HelpMessage="OS Source Root Location")]
  [string] $ImageSource = "\\foo\sources\osimages\w10-1803",
  [parameter(Mandatory=$False, HelpMessage="Name to Assign")]
  [string] $OSName = "Windows 10 x64 1803"
)
$Source = "$ImageSource\sources\install.wim"
if (!(Test-Path $Source)) {
  Write-Error "Boom!  And just like that your code ate itself."
  break
}
try {
  New-CMOperatingSystemImage -Name $OSName -Path $Source -Description $OSName -ErrorAction Stop
}
catch {
  Write-Error $_.Exception.Message
}

Import Windows 10 OS Upgrade Package (added in 1.1)

[CmdletBinding()]
param (
 [parameter(Mandatory=$False, HelpMessage="OS Source Root Location")]
 [string] $ImageSource = "\\foo\sources\osimages\w10-1803",
 [parameter(Mandatory=$False, HelpMessage="Name to Assign")]
 [string] $OSName = "Windows 10 x64 1803"
)
if (!(Test-Path $ImageSource)) {
  Write-Error "I bet Jimmy deleted your source folder. You know what to do next."
  break
}
try {
  New-CMOperatingSystemInstaller -Name $OSName -Path $ImageSource -Description $OSName -ErrorAction Stop
}
catch {
  Write-Error $_.Exception.Message
}

Create a Console Folder (added in 1.1)

[CmdletBinding()]
param (
  [parameter(Mandatory=$False, HelpMessage="Site Code")]
  [string] $SiteCode = "P01",
  [parameter(Mandatory=$False, HelpMessage="Folder Name")]
  [string] $FolderName = "Windows Client",
  [parameter(Mandatory=$False, HelpMessage="Parent Folder")]
  [ValidateSet('Application','BootImage','ConfigurationBaseline','ConfigurationItem','DeviceCollection','Driver','DriverPackage','OperatingSystemImage','OperatingSystemInstaller','Package','Query','SoftwareMetering','SoftwareUpdate','TaskSequence','UserCollection','UserStateMigration','VirtualHardDisk')]
  [string] $ParentFolder = "OperatingSystemImage"
)
Set-Location "$($SiteCode):"
try {
  New-Item -Path "$SiteCode`:\$ParentFolder" -Name $FolderName -ErrorAction Stop
}
catch {
  Write-Error $_.Exception.Message
}

Move a Console Item into a Custom Folder (added in 1.1)

$OsImage = "Windows 10 x64 1803"
$Folder = "\OperatingSystemImage\Windows Client"
try {
  Get-CMOperatingSystemImage -Name $OsImage |
    Move-CMObject -FolderPath $Folder
}
catch {
  Write-Error $_.Exception.Message
}

Semi-Bonus: Create a Device Collection for each OS in AD

[CmdletBinding()]
param (
  [parameter(Mandatory=$False, HelpMessage="Site Code")]
  [string] $SiteCode = "P01"
)
Import-Module ActiveDirectory
$osnames = Get-ADComputer -Filter * -Properties "operatingSystem" | Select-Object -ExpandProperty operatingSystem -Unique
$key = "HKLM:\SOFTWARE\Microsoft\SMS\Setup"
$val = "UI Installation Directory"
$uiPath = (Get-Item -Path $key).GetValue($val)
$modulePath = "$uiPath\bin\ConfigurationManager.psd1"
if (!(Test-Path $modulePath)) {
  Write-Error "Sudden implosion of planetary system.  The end. Roll the credits and dont forget to drop your 3D glasses in the barrel outside."
  break
}
Import-Module $modulePath
Set-Location "$($SiteCode):"
foreach ($os in $osnames) {
  $collname = "Devices - $os"
  try {
    $sched = New-CMSchedule -DurationInterval Days -DurationCount 7 -RecurCount 1 -RecurInterval 7
    New-CMCollection -Name $collname -CollectionType Device -LimitingCollectionName "All Systems" -RefreshType Both -RefreshSchedule $sched -ErrorAction SilentlyContinue
    $query = 'select distinct SMS_R_System.ResourceId, SMS_R_System.ResourceType, SMS_R_System.Name, SMS_R_System.SMSUniqueIdentifier, SMS_R_System.ResourceDomainORWorkgroup, SMS_R_System.Client from SMS_R_System where SMS_R_System.OperatingSystemNameandVersion="'+$os+'"'
    Add-CMDeviceCollectionQueryMembershipRule -CollectionName $collname -RuleName "1" -QueryExpression $query
    Write-Host "collection created: $collname"
  }
  catch {
    Write-Error $_.Exception.Message
  }
}


Scripting, System Center, Technology, windows

A Hammer to Turn Screws

20161120_160743

Script: Check-Readiness.ps1

Purpose: Keeps me busy and away from drinking too much coffee.  Okay, seriously, it’s just another flavor of “check for Windows 10 upgrade readiness using PowerShell”. It can be used within SCCM or while standing naked in a WalMart, your choice.

<#
.DESCRIPTION
.PARAMETER SourcePath
Why didn't they use PARAMETRE, hmm? So American. Anyhow, SourcePath is wherever the Windows 10 media is located.
.PARAMETER OutputPath
If not "" then it will dump a file named <computer>-<result>.txt in that location.
.NOTES
I was only half awake when I wrote this. Use at your own risk.
#>
[CmdletBinding()]
param (
    [parameter(Mandatory=$True, HelpMessage="Path to setup.exe")]
    [ValidateNotNullOrEmpty()]
    [string] $SourcePath,
    [parameter(Mandatory=$False, HelpMessage="Path to dump output data")]
    [string] $OutputPath = ""
)
$setup = Join-Path -Path $SourcePath -ChildPath "setup.exe"
Write-Verbose "setup source is $setup"
if (!(Test-Path $setup)) {Write-Error "$setup not found"; break}
Write-Verbose "starting assessment"
$p = Start-Process -FilePath $setup -Wait -ArgumentList "/Auto Upgrade /Quiet /NoReboot /Compat ScanOnly" -PassThru
Write-Verbose "exit code: $($p.ExitCode)"
switch ($p.ExitCode) {
    -1047526896 { $result = "UpgradeReady"; break } 
    -1047526912 { $result = "SysReqtsFault"; break } 
    -1047526904 { $result = "CompatIssues"; break } 
    -1047526898 { $result = "InsuffDiskSpace"; break } 
    default { $result = "InvalidProductSku"; break }
}
if ($OutputPath -ne "") { 
    $filename = "$($env:COMPUTERNAME)-$result.txt"
    $filepath = Join-Path -Path $OutputPath -ChildPath $filename 
    $result | Out-File -FilePath $filepath -Append -NoClobber -Encoding Default
}
Write-Output $result

Shove it out as a Package, or make it a Script object you can spray all over helpless devices via Run Script.  Or run it directly (just add hot water and PSRemoting), or print it out, hang it on the wall, and laugh hysterically at it.  No matter what, it beats whatever your next staff meeting has to offer.

Cheers!

Scripting, System Center, Technology, windows

ConfigMgr Device Naming, Part 2: The Electric Boogaloo


1f3be4a21f5823b4516b458ba2f89a87--drink-coffee-coffee-cafe

So the previous blog post infuriated a few people, so I thought “I can do better than that. I can infuriate more people!” and came up with this:

I combined several PowerShell scripts, some oatmeal, hot water, chopped walnuts and a fresh cup of coffee into a single, mono-nuclear, monolithic uber-script that can be awoken (that’s a real word, I checked) from within a task sequence to rope the legs of the device, hold it down, and burn a new name on it.

You can view and laugh at it here.

Note: If you wish to ignore and infuriate people who strongly advise against using location names as part of device names, you will also want the associated “locations.txt” file to go with this steaming pile of electrons.  This is a poor man’s version of using an MDT CustomSettings.ini with DefaultGateway mappings, only poorer, and it hasn’t had anything to eat in a long, long time.

How to make this cat say “moo”…

  1. Drop the script files in a folder
    1. If you’re using location names, be sure to edit the locations.txt file to suit your environment.
  2. Create a new (or update an existing, your choice) Package in Configuration Manager.
  3. The Package contains source files, but has no Program entries, at least not for this script.
  4. Distribute that mess out into your unsuspecting environment.
  5. Add a task sequence step (Add > General > Run PowerShell Script)
    1. Insert somewhere above the “Apply Operating System” step
    2. Name: Set Computer Name
    3. Select the Package with the the script
    4. Script name: Set-ComputerName.ps1
    5. Parameters: (see notes)
    6. PowerShell execution policy: Bypass
  6. Click OK
  7. Deploy
  8. Run like hell

Figure 1 shows an example using the -Interactive parameter.  Figure 2 shows an example of using the fully-automatic, belt-fed, multi-rotational, liquid-cooled location-based naming option, which implies the -InfuriatesTheShitOutOfSomeAdmins parameter.

set-name1Figure 1 – Comes before Figure 2 🙂

set-name2Figure 2 – Comes right after Figure 1

Notes:

  • The -Interactive [switch] parameter ignores all other parameters except -DefaultName.  This parameter displays a really fancy, super-complex, highly-sophisticated dialog form for entering the computer name.  It looks like this…
    set-name3
  • -DefaultName is a [string] parameter which is set to “” by default.  If a value is assigned, it overrides everything like a car crashing through a drug store front window at 50 mph.
    Example: -DefaultName “DOUCHEBAG”
  • -UseLocation is a [switch] parameter which references the default IP gateway, at the time of imaging, to determine the location code to add to the device name.  If no matching gateway is found, you can force a default using the -DefaultLocation parameter.  You can also use multiple location.txt files (with different filenames of course) by using the -LocationFile parameter.  This might be useful when you have a CAS environment and want to segregate different sub-groups of IP gateways for some crazy, glue-sniffing reason. The locations.txt file uses a strict format which took decades to refine:  GATEWAYADDRESS=FULLNAME,SHORTNAME
    Example: -UseLocation -DefaultLocation “LON” -LocationFile “en-gb.txt”
    Example: -UseLocation -DefaultLocation “CLT”
  • -UseHyphens is a [switch] parameter that will concatenate the sub-atomic naming particles into a cohesive pile of dung using 100% organic gluten-free hyphen characters.
    Example: (without) “D1234”
    Example: (with) “D-1234”
  • -SnMaxLen controls the maximum length of the BIOS serial number values to allow when concatenating the final name value.  In most cases, a serial number won’t cause a problem, but within some virtual environments, the serial number can be almost as long as a fillibuster speech on Capitol Hill.  The default is 8 characters.  The truncation is from the left, so this fetches the right-most characters.
    Example: -SnMaxLen 10
  • -Testing is a [switch] parameter for running the script outside of a task sequence for testing and validation only.  If you don’t use -Testing and not running within a task sequence session, it will throw some ugly red errors at you because it can’t invoke the Microsoft.SMS.TSEnvironment interface.  Can be combined with any or all other parameters.
    Example: -Testing
  • If you wish to change the “form factor” codes (“D”, “L”, etc.) you will need to edit the {switch} block code within function Get-FormFactorCode. Between lines 170 and 185 or so.

So, for those of you that find this useful: glad I could help in some small way.  For those who are even more angry: Decaf is on sale at Trader Joe’s this week.  Stock up.

😀

Devices, Scripting, System Center, Technology, windows

ConfigMgr OSD Device Naming

For whatever reasons, this still seems to be an interesting and ongoing topic of discussion/debate/argument/angst/drinking, etc.  I’m talking about assigning names to computers while they’re being imaged or refreshed.  There are quite a few common scenarios, and an unknown variety of less-common scenarios, I’m sure.  Some embrace this and some despise it.  The views are all over the place it seems.  But regardless, as a consultant, I’m very often tasked with advising (okay: consulting) customers on options for either fully or partially automating the process.

Personally, I approach all automation scenarios with the same view: Explain why you need it.  Very often, automation is simply taking over from a poorly designed manual process.  As an old colleague of mine once said (and I repeat ad nauseum) “If you automate a broken process, you can only get an automated broken process“.  It’s true.  If the customer is receptive to a discussion about alternatives, it always produces a more positive outcome.  So far, at least.

Anyhow, I wanted to lay out some common scenarios and examples for handling them.  These are based on the use of either Microsoft System Center Configuration Manager (aka ConfigMgr, aka SCCM), or Microsoft Deployment Toolkit (aka MDT).  I am by no means implying these are the ONLY way to accomplish each scenario.  They are provided simply as ONE way out of many, but which I’ve found offer the best benefit for the least effort and risk.  You are free to roll your eyes and call me a dumbass, that’s fine, because I plug my ears anyway.

Manual: Stick shift (The Exploding Space Shuttle Method)

This method requires a human to manually enter the desired name to assign to the device.  It’s the easiest/quickest method to implement.

For ConfigMgr environments, the quickest implementation is by assigning “OSDComputerName” Collection Variable to a device collection.  For bare metal (e.g. new) machines, that is often the “Unknown Computers” collection, but for refresh/reimage scenarios it’s whatever device collection is being targeted by the relevant task sequence.

Pro – easy, fast, cheap

Con – prone to human error

Fully-Automatic: Serial Number

Since Windows 10 still imposes a limit of 15 characters, with restrictions on certain alphanumeric characters, this method often includes some checking/filtering to insure that the process doesn’t swallow a grenade and make a mess.  This is less common today with physical machines, but often occurs with virtualized environments due to differing serial number formats.  This example uses the BIOS serial number as the machine name.  If the serial number is longer than 15 characters, only the last 15 characters are used.  So “CNU1234567891234” would become “NU1234567891234”.

# Set-ComputerNameAutoSN.ps1
$snmax = 15
$csn = (Get-WmiObject -Class Win32_SystemEnclosure).SerialNumber
if ($csn.Count -gt 1) { $csn = $csn[0] }
if ($csn.Length -gt $snmax) {
  $csn = $csn.Substring($csn.Length - $snmax)
}
try {
  $tsenv = New-Object -ComObject Microsoft.SMS.TSEnvironment
  $tsenv.Value("OSDComputerName") = $csn
  Write-Output 0
}
catch {
  Write-Output "not running in a task sequence environment"
}

Note: You might be wondering why the “if ($csn.Count -gt 1)…” stuff.  That’s in case the device is sitting in a dock or connected via an e-dock or dongle, which often causes WMI queries to return an array instead of a single integer for things like ChassisTypes and so on.  Checking the count of values assigned to the variable allows for retrieving just the first element in the array.

Full-Automatic: Form-Factor + Serial Number

This is a variation on the preceding example, whereby a prefix (or sometimes a suffix) is added to the name to identify a general form, such as “D” for desktop, and “L” for laptop, and so on.  This example would take a ChassisType value of 3 and the last 10 characters (arbitrary, not required) of the Serial Number of “CNU1234567891234” and concatenate these into “D4567891234”

# Set-ComputerNameAutoFormSN.ps1
$snmax = 10
$csn = (Get-WmiObject -Class Win32_SystemEnclosure).SerialNumber
$cff = (Get-WmiObject -Class Win32_SystemEnclosure).ChassisTypes
if ($csn.Count -gt 1) { $csn = $csn[0] }
if ($cff.Count -gt 1) { $cff = $cff[0] }
if ($csn.Length -gt $snmax) {
  $csn = $csn.Substring($csn.Length - $snmax)
}
switch ($cff) {
   3 { $ff = 'D'; break }
   4 { $ff = 'D'; break }
   5 { $ff = 'D'; break }
   6 { $ff = 'D'; break }
   7 { $ff = 'D'; break }
   8 { $ff = 'L'; break }
   9 { $ff = 'L'; break }
  10 { $ff = 'L'; break }
  11 { $ff = 'L'; break }
  14 { $ff = 'L'; break }
  default { $ff = 'X'; break }
}
$newname = $ff+'-'+$csn
try {
  $tsenv = New-Object -ComObject Microsoft.SMS.TSEnvironment
  $tsenv.Value("OSDComputerName") = $newname
  Write-Output 0
}
catch {
  Write-Output "you forgot to flush the toilet"
}

Semi-Automatic: Location Code + Form Factor + Serial Number

This one is based on a scenario where all devices are imaged at a single location, and shipped out to other locations, whereby the customer wishes to place the AD computer account into an associated location-based Organizational Unit (OU) during the imaging process.  This can be done using User-Driven Interface (UDI) forms, or by script.  I prefer script because I’m more comfortable with it and there are far fewer moving parts to contend with.  That said, there are several ways to do this:

Option 1 – SCCM Collection Variable

A collection variable can be assigned to the target collection in order to prompt for a location identifier.  This could be a number, a name, or an abbreviation, it doesn’t really matter since it’s just a textbox form input.

Option 2 – MDT / SCCM Task Sequence Script

Some flavors of this involve copying the ServiceUI.exe component from the MDT installation into the script package, so that ServiceUI.exe can be invoked to suppress the task sequence progress UI and allow custom script GUI forms to display properly.  I did it this way for a long time, until I ran across this really nice script from John Warnken *here*.  After some (minor) tweaking it can easily be adapted to almost any need.  The example below prompts the technician for a 3-character Location Code and then concatenates the device name using [Location]+[FormFactor]+[SerialNumber] up to 15 characters, so the [SerialNumber] value is truncated to the last 10 characters (max).

<#
Set-ComputerNameFormLocSN.ps1
.SYNOPSIS 
Displays a gui prompt for a computername usable in a SCCM OSD Task Sequence. 
 
.PARAMETER testing 
The is a switch parameter that is used to test the script outside of a SCCM Task Sequence. 
If this -testing is used the script will not load the OSD objects that are only present while a task sequence is running. 
instead it will use write-output to display the selection. 
 
.EXAMPLE 
powershell -executionpolicy Bypass -file .\Set-ComputerNameLocationPrompt.ps1 
 
.EXAMPLE 
powershell -file .\Set-ComputerNameLocationPrompt.ps1 -testing 
 
.NOTES 
This is a very simple version of a OSD prompt for a computername. You can add extra validation to the computer name, for example a regular expression test 
to ensure it meets standard form used in your environment. Addtional form object can be added to other options that you may want to set 
task sequence variables for. Also as a simple example, I just added the xaml for the wpf form as a variable in the script. You have the option of storing it in 
a external file if your form gets complex.

.Author 
Jonathan Warnken - jon.warnken (at) gmail (dot) com 
https://gallery.technet.microsoft.com/scriptcenter/Prompt-for-a-computername-6f99fa67
.Hallucinator
Skatterbrainz - @skatterbrainzz
#> 
[CmdletBinding()] 
param( 
  [parameter(Mandatory=$False)]
    [switch] $Testing
)
$snmax = 10
if(!$Testing){
  # this section provides the gluten-free, high-protein alternative to ServiceUI.exe
  $tsenv = New-Object -COMObject Microsoft.SMS.TSEnvironment  
  $tsui  = New-Object -COMObject Microsoft.SMS.TSProgressUI  
  $OSDComputername = $tsenv.Value("OSDComputername")
  $tsui.CloseProgressDialog() 
}

# query machine serial number and chassis type from WMI
$csn = Get-WmiObject -Class Win32_SystemEnclosure | Select-Object -ExpandProperty SerialNumber
$cff = Get-WmiObject -Class Win32_SystemEnclosure | Select-Object -ExpandProperty ChassisTypes

# check if return values are an array and if true, then only use the first element
if ($csn.Count -gt 1) { $csn = $csn[0] }
if ($cff.Count -gt 1) { $cff = $cff[0] }

# if serial number is longer than 10 chars, get last 10 chars only
if ($csn.Length -gt $snmax) {
  $csn = $csn.Substring($csn.Length - $snmax)
}
# derive form factor code from chassis type code
switch ($cff) {
   3 { $ff = 'D'; break }
   4 { $ff = 'D'; break }
   5 { $ff = 'D'; break }
   6 { $ff = 'D'; break }
   7 { $ff = 'D'; break }
   8 { $ff = 'L'; break }
   9 { $ff = 'L'; break }
  10 { $ff = 'L'; break }
  11 { $ff = 'L'; break }
  14 { $ff = 'L'; break }
  default { $ff = 'X'; break }
}
[xml]$XAML = @' 
<Window 
  xmlns="http://schemas.microsoft.com/winfx/2006/xaml/presentation" 
  xmlns:x="http://schemas.microsoft.com/winfx/2006/xaml" 
  Title="SCCM OSD Computername" Height="154" Width="425" Topmost="True" WindowStyle="ToolWindow"> 
  <Grid> 
    <Label Name="Computername_label" Content="Location:" HorizontalAlignment="Left" Height="27" Margin="0,10,0,0" VerticalAlignment="Top" Width="241"/> 
    <TextBox Name="LocationCode_text" HorizontalAlignment="Left" Height="27" Margin="146,10,0,0" TextWrapping="Wrap" Text=" " VerticalAlignment="Top" Width="220"/> 
    <Button Name="Continue_button" Content="Continue" HorizontalAlignment="Left" Margin="201,62,0,0" VerticalAlignment="Top" Width="75"/> 
  </Grid> 
</Window> 
'@ 
[void][System.Reflection.Assembly]::LoadWithPartialName('presentationframework') 
#Read XAML 
$reader=(New-Object System.Xml.XmlNodeReader $xaml) 
$Form=[Windows.Markup.XamlReader]::Load( $reader )

# add form objects as script variables 
$xaml.SelectNodes("//*[@Name]") | %{Set-Variable -Name ($_.Name) -Value $Form.FindName($_.Name)}

# set the default value for the form textbox
$LocationCode_text.Text = 'STL'

# assign event handler to the "Continue" button
$Continue_button.add_Click({ 
  $Script:LocationCode = $LocationCode_text.Text.ToString()
  $Form.Close() 
})
# display the form for user input
$Form.ShowDialog() | Out-Null

# after form is closed, concatenate computer name from input values and other variables
$computername = $Script:LocationCode+$ff+$csn

if (!$Testing) {
  $tsenv.Value("OSDComputername") = $computername 
  Write-Output " OSDComputername set to $($tsenv.value("OSDComputername"))" 
}
else { 
  Write-Output " OSDComputername would be set to $computername" 
}

Pro – works with PXE and offline media

Con – some scripting and testing required

Fully Automatic: Location Code + Form Factor + Serial Number

This method relies on something available from the environment upon which to determine the “location”.  For MDT this is often using the CustomSettings.ini with the IP Gateway address.  Using a logical if/then you can construct a logic mapping of IP gateway = Location or location Code.

Option 1 – MDT Deployment Share Configuration

This one uses a CustomSettings.ini which reads the IPv4 Gateway address and the Serial Number to concatenate the resultant device name.  For a better example of this and a much, much better explanation by the one-and-only Mikael Nystrom, please read this first.

[Settings]
Priority=Init, ByDesktop, ByLaptop, DefaultGateway, Default 
Properties=ComputerLocationName, ComputerTypeName, ComputerSerialNumber

[Init]
ComputerSerialNumber=#Right("%SerialNumber%",10)#

[ByLaptop]
SubSection=Laptop-%IsLaptop%
ComputerTypeName=L

[ByDesktop]
SubSection=Desktop-%IsDesktop%
ComputerTypeName=D

[DefaultGateway]
192.168.1.1=Norfolk
192.168.2.1=Chicago
192.168.3.1=NewYork

[Norfolk]
ComputerLocationName=NOR

[Chicago]
ComputerLocationName=CHI

[NewYork]
ComputerLocationName=NYC

[Default]
OSInstall=Y
ComputerLocationName=XXX
ComputerTypeName=X
OSDComputerName=%ComputerLocationName%%ComputerTypeName%%ComputerSerialNumber%
SkipCapture=YES
SkipAdminPassword=YES
SkipProductKey=YES
SkipComputerBackup=YES
SkipBitLocker=YES

Using this sample INI configuration, a laptop device with Serial Number “CNU1234567891234” connected to IP gateway 192.168.3.1 would end up with an assigned name of “NYCL4567891234”.  If the DefaultGateway is not defined in the list, it will default to location code “XXX”.  If the form factor cannot determine Desktop or Laptop it will default to “X”.  So, using the same serial number value it would end up as “XXXX4567891234”.

Option 2 – SCCM Task Sequence

This example adapts the semi-automatic example above, but replaces the GUI prompt with a check for the IP gateway.

# Set-ComputerNameAutoLocIPFormFactorSN.ps1
$csn = (Get-WmiObject -Class Win32_SystemEnclosure).SerialNumber
$cff = (Get-WmiObject -Class Win32_SystemEnclosure).ChassisTypes
if ($csn.Count -gt 1) { $csn = $csn[0] }
if ($cff.Count -gt 1) { $cff = $cff[0] }
if ($csn.Length -gt 15) {
  $csn = $csn.Substring($csn.Length - 15)
}
$gwa = (Get-WmiObject -Class Win32_NetworkAdapterConfiguration | Where {$_.IPEnabled -eq $True}).DefaultIPGateway
switch ($gwa) {
  '192.168.1.1' {
    $location = 'Norfolk'
    $loccode = 'NOR'
    break
  }
  '192.168.2.1' {
    $location = 'Chicago'
    $loccode = 'CHI'
    break
  }
  default {
    $location = 'NewYork'
    $loccode = 'NYC'
    break
  }
}
switch ($cff) {
   3 { $ff = 'D'; break }
   4 { $ff = 'D'; break }
   5 { $ff = 'D'; break }
   6 { $ff = 'D'; break }
   7 { $ff = 'D'; break }
   8 { $ff = 'L'; break }
   9 { $ff = 'L'; break }
  10 { $ff = 'L'; break }
  11 { $ff = 'L'; break }
  14 { $ff = 'L'; break }
  default { $ff = 'X'; break }
}
$newName = $loccode+$ff+$csn
try {
  $tsenv = New-Object -ComObject Microsoft.SMS.TSEnvironment
  $tsenv.Value("OSDComputerName") = $newName
  Write-Output 0
}
catch {
  Write-Output "not running in a task sequence environment"
}

Option 3 – SCCM Task Sequence + Collection Variable

This example came from a project where the customer had created a device collection for each branch location, which had a Collection Variable “DeviceLoc” assigned, and having deployed a refresh task sequence to each.  So in this scenario, they wanted to merge the script with the collection variable to derive the new name.  Is this ideal?  Not for most people, but due to time constraints it had to work.

$csn = (Get-WmiObject -Class Win32_SystemEnclosure).SerialNumber
$cff = (Get-WmiObject -Class Win32_SystemEnclosure).ChassisTypes
if ($csn.Count -gt 1) { $csn = $csn[0] }
if ($cff.Count -gt 1) { $cff = $cff[0] }
if ($csn.Length -gt 15) {
  $csn = $csn.Substring($csn.Length - 15)
}
$gwa = (Get-WmiObject -Class Win32_NetworkAdapterConfiguration | Where {$_.IPEnabled -eq $True}).DefaultIPGateway
switch ($gwa) {
  '192.168.1.1' {
    $location = 'Norfolk'
    $loccode = 'NOR'
    break
  }
  '192.168.2.1' {
    $location = 'Chicago'
    $loccode = 'CHI'
    break
  }
  default {
    $location = 'NewYork'
    $loccode = 'NYC'
    break
  }
}
switch ($cff) {
   3 { $ff = 'D'; break }
   4 { $ff = 'D'; break }
   5 { $ff = 'D'; break }
   6 { $ff = 'D'; break }
   7 { $ff = 'D'; break }
   8 { $ff = 'L'; break }
   9 { $ff = 'L'; break }
  10 { $ff = 'L'; break }
  11 { $ff = 'L'; break }
  14 { $ff = 'L'; break }
  default { $ff = 'X'; $ousub = ''; break }
}
try {
  $tsenv = New-Object -ComObject Microsoft.SMS.TSEnvironment
  $loc = $tsenv.Value("DeviceLoc")
  if ([string]::IsNullOrEmpty($loc)) {
    $newName = 'CRP'+$ff+$csn
  }
  else {
    $newName = $loc+$ff+$csn
  }
  $tsenv.Value("OSDComputerName") = $newName
  Write-Output 0
}
catch {
  Write-Output "not running in a task sequence environment"
}

Conclusion / Summary

This is only a small sample of all the variations and scenarios many of us encounter.  Other variants include setting the Organizational Unit (OU) path, adding the device to domain security groups, and so on.  I would like to thank John Warnken for the script code he posted on TechNet, which makes it so much easier to deal with the progress bar UI when using custom forms.

I’d also like to say that you shouldn’t look at these and think you need to immediately put them into use.  Test labs are one thing.  But production requires serious review and planning to determine what really makes the most sense.  For example, a lot of customers I work with have persistently used a location code for device names, but when they really assess the business environment, they find many devices roam to different locations, or don’t really stay in any “official” location (home, hotel, on the road, etc.)  And when pressed to explain how the location code provides real value, many don’t have a rationale besides, “it’s how we’ve always done it”.  So think it through.  Ask if you really need to do something like this and if so, why.  Then work on the how aspects.

Do you have other/better examples you’d like to share?  Post a comment below.  Thank you for reading!